Making Responsive Rectangles and Squares with CSS

The basic conceptual and literal building block of most responsive CSS shapes is the rectangle. In terms of geometry, a rectangle is a parallelogram where each corner is a right angle. This means that once you know how to make a responsive CSS rectangle, you’ll automatically know how to make a responsive CSS square. Always remember: squares are just rectangles where all of the sides are the same length.

Non-Responsive Rectangles

It is really easy to make a non-responsive rectangle using a single div and a just a smidgen of CSS. If you squish your browser window you’ll see that this rectangle has a fixed width and height.

HTML

<div class="fixed-rectangle"></div>

CSS

div.fixed-rectangle {
     width: 400px;
     height: 100px;
     background-color: #ca0164;
}

To make this fixed size rectangle all we need to do is apply a width and height to the .fixed-rectangle class we are using to identify the div. I added a background color so that you can see the rectangle, but remember that background colors aren’t required to actually create the shape itself.

If you were to change the width and height in the CSS for this fixed-size rectangle to percentages, your code wouldn’t work and nothing would render. The reason this will not work is because percentage height is always calculated based on the height of the element and in this case, the height of the element would always be zero. How then can one make a responsive rectangle?

Responsive Rectangles

The key to making a truly responsive rectangle is vertical padding, either padding-bottom or padding-top will work. Why, you might ask? Vertical padding is calculated on the basis of the width of the element. Therefore, when using vertical padding in combination with a percentage width one can maintain an aspect ratio across widths, which is what truly defines a responsive rectangle.

There are a few different ways of making responsive rectangles, but the below code demonstrates my favorite basic method. This code can be extended to incorporate a number of other things, including text.

HTML

<div class="flex-rectangle"></div>

CSS

.flex-rectangle{
    width: 100%;
    background: #ca0164;
}
.flex-rectangle:before{
    content: "";
    display: block;
    padding-top: 25%;
}

So how does this work? The width of the rectangle is established through a percentage width on the selector. I’ve added a background color here as well so that you can actually see the rectangle. Again, a background color is not required for the element to render.

I’ve used the pseudo-selector :before to add the padding to the element. In order for anything to render, the pseudo-selector needs the content property to be included, though you don’t need to (and shouldn’t) include any actual content. The pseudo-selector also needs to be displayed as a block element.

The padding-top property is what governs the height and aspect ratio of the rectangle. Remember that this value is calculated based on the width of the element. In this case I wanted the rectangle to have a 4:1 aspect ratio to match our fixed size example. Therefore, I needed to set the vertical height to a quarter of the width of the element, which is 25% in this case. If the width of the rectangle was set to 80% we’d need to set padding-top to 20% in order to achieve the same 4:1 aspect ratio.

Responsive Squares

Now that we’ve walked through a responsive rectangle, making a responsive square should be easy. All we need to do is make a responsive rectangle with a 1:1 aspect ratio.

HTML

<div class="flex-square"></div>

CSS

.flex-square{
    width: 30%;
    background: #ca0164;
}
.flex-square:before{
    content: "";
    display: block;
    padding-top: 100%;
}

The width of our square is set to 30% and padding-top is set to 100% on the pseudo-element. We have a 1:1 aspect ratio and therefore a square because the height is set to 100% of the width.

Browser Support

This method will work in all modern browsers and in Internet Explorer 9 and above. Remember, Internet Explorer 8 did not support responsive design without some serious hackery, so it makes total sense that responsive shapes would be a no-go in IE8!

CSS Transitions: The Basics

The standard linguistic definition of a transition is a “movement, passage, or change from one position, state, stage, subject, concept, etc., to another.” Within CSS, transitions do exactly what you’d expect: they allow for elements to change from one state to another over time.

My favorite short explanation of what the CSS transition property does is from Chris Coyier of CSS Tricks:

The transition property is a shorthand property used to represent up to four transition-related longhand properties [that] allow elements to change values over a specified duration, animating the property changes, rather than having them occur immediately.

The four properties governed by CSS transitions are:

  • transition-property
  • transition-duration
  • transition-timing-function
  • transition-delay

Syntax

The syntax for CSS transitions allows for all possible transitions to be bundled into one line of code and also allows for the granular specification of each property on its own. Each transition property will accept one of an available set of values whether you are using the shorthand or longhand CSS structure.

Shorthand

transition: <property> <duration> <timing-function> <delay>;

Longhand

transition-property: <property>;
transition-duration: <duration>;
transition-timing-function: <timing-function>;
transition-delay: <delay>;

Transition Property

The aptly named transition-property property specifies which property or properties will be impacted by the transition. The default value for this property is all.

Syntax

transition-property: value;

Accepted transition-property values are:

  • all
  • none
  • single property name
  • multiple property names, separated by commas

Example: Stage 1

This example includes just the transition-property value. For all examples, hover over the smiley box in order to see the active state.

.box {
	transition-property: color, background-color, width;
    	color: #ffffff;
    	background-color: #ca0164;
    	width: 3em;
        height: 3em;
        text-align: center;
} 

.box:hover {
	color: #384042;
	background-color: #F5B54B;
	width: 3.6em;
}

Transition Duration Property

The transition-duration property specifies the amount of time the transition will take. The default value for this property is zero seconds..

Syntax

transition-duration: value;

Accepted transition-duration values are:

  • time in seconds (s) or milliseconds (ms)
  • multiple time values, separated by commas
  • initial
  • inherit

Example: Stage 2

In this example, we’ve added a transition-duration of two seconds in addition to specifying the transition-property value. The transition between the initial state and the active state is now smoother upon hover due to the presence of the transition-duration function.

.box {
	transition-property: color, background-color, width;
        transition-duration: 2s;
    	color: #ffffff;
    	background-color: #ca0164;
    	width: 3em;
        height: 3em;
        text-align: center;
} 

.box:hover {
	color: #384042;
	background-color: #F5B54B;
	width: 3.6em;
}

Transition Timing Property

The transition-timing-function specifies the pace at which the transition will run. The default value for this property is ease.

Syntax

transition-timing-function: value;

Accepted transition-timing-function values are:

  • ease
  • linear
  • ease-in
  • ease-out
  • ease-in-out
  • step-start
  • step-end
  • custom cubic Bézier curve value
  • custom stepping function value

The transition timing function’s possible values are an immensely complex topic. To learn more about them, you should read this amazing article.

Example: Stage 3

In this example, we’ve added the transition-timing-function ease-in-out in addition to specifying values for transition-property and transition-duration. The transition between the initial state and the active state now changes pace midway through due to the presence of the transition-timing-function property value.

.box {
	transition-property: color, background-color, width;
        transition-duration: 2s;
        transition-timing-function: ease-in-out;
    	color: #ffffff;
    	background-color: #ca0164;
    	width: 3em;
        height: 3em;
        text-align: center;
} 

.box:hover {
	color: #384042;
	background-color: #F5B54B;
	width: 3.6em;
}

Transition Delay Property

The transition-delay property specifies when the transition will start relative to the instant the property value changes. The default value for this property is zero seconds.

Syntax

transition-delay: value;

Accepted transition-delay values are:

  • time in seconds (s) or milliseconds (ms)
  • multiple time values, separated by commas
  • initial
  • inherit

Example: Stage 4

In this example, we’ve added the a transition-delay of three seconds in addition to specifying values for transition-property, transition-duration, and transition-timing-function properties. Now, when you hover over the box, the transition between the initial state and the active state takes three seconds to start due to the presence of the transition-delay property value.

.box {
	transition-property: color, background-color, width;
        transition-duration: 2s;
        transition-timing-function: ease-in-out;
        transition-delay: 3s;
    	color: #ffffff;
    	background-color: #ca0164;
    	width: 3em;
        height: 3em;
        text-align: center;
} 

.box:hover {
	color: #384042;
	background-color: #F5B54B;
	width: 3.6em;
}

Browser Support

CSS transitions are supported in all major browsers including Internet Explorer 10 and above. The lack of support for Internet Explorer 9 and below may be a minor roadblock towards implementing transitions in your projects, so make sure you employ CSS transitions with an eye towards graceful degradation. There is one remaining browser prefix required for full cross-browser support (listed below).

Prefix Requirements

  • -webkit-

CSS Transform Origin Property

The CSS transform origin property defines the point from which a CSS transform is applied to an element.

Transform Origin Syntax

The syntax for identifying the value of the transform-origin property takes into account the x-offset and y-offset of the point of origin. The x-offset is a length or percentage from the left edge of the element. Correspondingly, the y-offset is a length or percentage from the top edge of the element.

transform-origin: x-offset y-offset;

The default value for the transform-origin property is the center of an element (50% 50%).

Any unit that can be used to define the length of an element (px, em, rem, percentage) can be used to identify the x-offset and y-offset values of the transform-origin property. Additionally, there are several keywords that are acceptable for use with the transform-origin property:

  • left (0%)
  • center (50%)
  • right (100%)
  • top (0%)
  • bottom (100%)

Examples

For context, the examples included here show a faded version of the box in it’s original position, prior to the transform, behind each transformed element.

Rotate

Rotate 25 Degrees to the Left with Transform Origin at Top Right

.box { 
      transform: rotate(-25deg); 
      transform-origin: 100% 0%;
} 

Rotate 25 Degrees to the Left with Transform Origin at Bottom Right

.box { 
      transform: rotate(-25deg); 
      transform-origin: right bottom;
} 

Scale

Scale to 50% with Transform Origin at Top Right

.box { 
      transform: scale(0.5); 
      transform-origin: 100% 0%;
} 

Scale to 50% with Transform Origin at Bottom Right

.box { 
      transform: scale(0.5); 
      transform-origin: right bottom;
} 

Skew

Skew 25 Degrees to the Left with Transform Origin at Top Right

.box { 
      transform: skewX(25deg); 
      transform-origin: 100% 0%;
} 

Skew 25 Degrees to the Left with Transform Origin at Bottom Right

.box { 
      transform: skewX(25deg); 
      transform-origin: right bottom;
} 

Translate

You’ll notice that when the transform-origin property is applied to a translate transform function that there is no apparent visual difference in the outcome. This is because the element impacted by the transform is moved without changing it’s shape, size, or rotation.

Translate 1em to the Bottom Right with Transform Origin at Top Right

.box { 
      transform: translate(1em, 1em); 
      transform-origin: 100% 0%;
} 

Translate 1em to the Bottom Right with Transform Origin at Bottom Right

.box { 
      transform: translate(1em, 1em); 
      transform-origin: right bottom;
} 

Browser Support

CSS transform-origin is supported in all major browsers including Internet Explorer 9 and above. There are a handful of browser prefixes that are required for full cross-browser support (listed below).

It’s also important to note that though 3d transforms are not yet fully supported, they can be use in quite a few browsers now. With 3d transforms, a third value is accepted through the transform-origin property that represents the z axis.

Prefix Requirements

  • -ms-
  • -webkit-

Three Common Visual Mistakes in Web Design

I can not browse the internet like a normal person because I build websites for a living. I constantly critique the websites I find and open up my code inspector to see how a particular effect was achieved. With surprising frequency I have come across websites (including quite a few for huge companies) that are generally beautifully constructed, but that have a glaring visual error that somehow made it past quality control testing. The following mistakes are the offenders that make me cringe the most.

1. Formatting that Forces a Horizontal Scroll Bar

Horizontal scroll bars are expected on websites that were built with a fixed width. However, when a horizontal scroll bar appears on a responsive website, it is symptomatic of an element on the page overflowing beyond that page’s 100% width container.

In a lot of cases I’ve noticed that this phenomenon is specific to only one page or type of page on a website, which helps explain how this issue could have been missed during testing. Elements introduced by content managers into a blog post, for example, can cause this issue on single pages. Often, this issue is not a problem on all widths, but may impact just some screen widths.

A few things that can cause overflow to happen are:

  • fixed width elements that are wider than the current viewport width
  • elements where overflow should be, but is not set to “hidden”
  • when a percentage width is combined with a fixed width and therefore “outgrows” the available screen real estate
  • iframes
  • images or videos that are not responsive

Fixing this particular problem can be tricky and typically involves some detective work. The key element of fixing the problem is identifying which element or elements on the page are causing the overflow. From there, one can make a decision about how to approach fixing that particular issue.

When I run across this issue on a website I am building, I typically will look for the source of the problem by hiding entire sections of the DOM one at a time to see if the scroll bar disappears once a particular element is hidden. Usually I add display: none; to elements using my code inspector to remove them one at a time. In particularly persnickety cases I may comment out entire sections of code that I have identified are NOT the problem so that I can more easily continue to inspect other parts of the page.

2. Favicons from Software or Frameworks

Building a website on top of an open source content management system like WordPress or Drupal is an awesome thing, but leaving the WordPress or Drupal logos as the favicon for your website is not. I also frequently see websites that still have the favicon from the Genesis Framework, which is a popular theme framework for WordPress.

The fix for this problem is simple: create your own favicon that utilizes the logo or branding of the client. Though I don’t recommend it, another option is removing the favicon entirely: no favicon is better than someone else’s favicon.

3. Very Wide Blocks of Text

There are a whole host of typographic sins that are committed constantly on the internet, but this particular problem can be very subtle, which is why I think it is often overlooked.

Wide blocks of text are a problem for readability of content. It is difficult for the human eye to focus on a line of text much beyond 100 characters. Historically, this is part of why newspapers have generally been typeset using narrow column widths.

Typically, if a website was designed with typographic best practices in mind, the comps for mobile, tablet, or desktop screen widths would not have included wide blocks of text. When this issue appears, I think wide text blocks have usually been introduced unintentionally in the development phase of the project. A developer may have failed to pay attention to what happens in between established breakpoints or they may have actively introduced wide text blocks when improvising design between or beyond established breakpoints.

Solutions to fix this particular problem are varied and heavily depend on the design of the particular site in question. Often the fix is to continue a design pattern from a different breakpoint, to establish a maximum width for a particular section, or to add a new breakpoint to address this specific issue.

Conclusion

I’m a stickler for visual details and it drives me nuts when I see these mistakes in the wild. Are there other visual mistakes you’ve noticed that consistently appear on websites you visit? Let me know in the comments.

What Developers Mean when they say “Don’t Hack Core”

In both the WordPress and Drupal communities you’ll frequently hear the refrain “don’t hack core.” What does that mean though? Often I see this phrase used out of context or without explanation. When I was first learning to code, I certainly didn’t know what it meant, I just knew that one time my mentor pointed to most of the files in WordPress and very seriously told me that touching them or changing them was very very bad.

What is core?

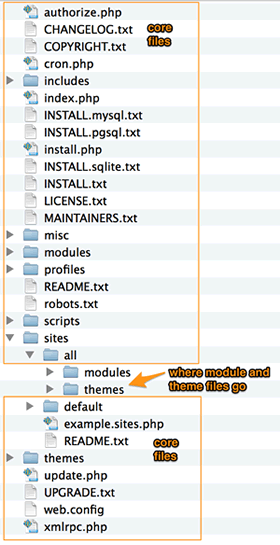
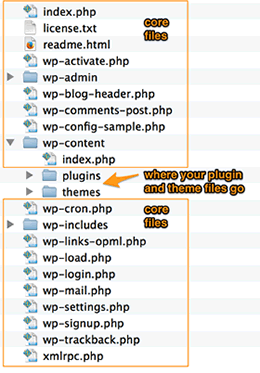
In order to not hack core, we first must be able to identify what core is. In general, “core” refers to the basic set of core files that make up a content management system. When you download WordPress or Drupal, the core files are what you download.

WordPress Core File Structure
Drupal Core File Structure

What does “hacking” core mean?

In the context of the phrase “don’t hack core” the word “hack” simply means “to change.” This means that you should not make any changes to core.

It’s that simple: do not change the core files. Changing the core files in any way is hacking the core files. Do not hack the core files.

Where am I allowed to make changes?

Of course, in order to customize WordPress or Drupal you will need to add theme and plugin or module files. There are very specific places where these files belong within the core file structure. In WordPress, custom theme files should be located under wp-content/themes and plugin files should be located under wp-content/plugins. In Drupal, your custom theme files should be located under sites/all/themes and module files should be located under sites/all/modules.

There is also a file that you may need to edit in order to make sure that your database is connected to your website (wp-config.php in WordPress and settings.php in Drupal). You’ll notice though that these files are not included when you initially download either CMS’s software. They are created as part of the installation process. In WordPress, wp-config.php is located at the root level and in Drupal, settings.php is located under sites/default.

Some developers will argue that they need to change core because they discovered a problem with it. If you find a bug in core and have a patch for the problem, then submit a bug report to the core development team for the software you are using. In the meantime, don’t hack core.

Why is hacking core bad?

In the most general sense, hacking core is bad because of the security, maintenance, and compatibility problems that making changes to core files can cause with your site. It can cause unforeseen and bizarre problems with the display of a website and can also be a root cause of issues that can bring down a website entirely.

There are also very specific reasons why hacking core is a bad idea. They are:

1. Inability to Easily Update Core

WordPress and Drupal frequently release updates to their core software. These updates include security updates, bug fixes, and new features. It is recommended that you upgrade your software as new versions become available so that your website is protected from any known security vulnerabilities and that it remains compatible with the most current versions of plugins and themes.

When you update either WordPress or Drupal, you are functionally replacing the old core files with new versions of the files. Therefore, when you “hack” core by making a modification to the core files, you are guaranteeing that you’ll need to redo these hacks with every update released for your software. Since the core software is changing with every update it is certainly possible that the hack you originally implemented will not be exactly replicable with a new version of the software.

2. Security Vulnerabilities

When a security vulnerability impacts WordPress or Drupal core, the core developers and community for each project will release an update that patches the vulnerability. If you create your own independent version of open source software, which is what you are doing when you change core even a little bit, you may create vulnerabilities and not even know it. You run the risk of having your site compromised and then having no one who can help you troubleshoot because your underlying software is unique.

3. Maintenance Problems

Most websites are maintained by multiple people over time. This can be due to staff or agency changes or simply due to the primary site maintainer going on vacation. If another person is trying to fix a problem on the website where you hacked core, you can not assume that this new person will look for changes within the core files because it is best practice to NOT change these files. This hypothetical person will instead look first in all of the places where changes should be made, like in child theme and custom plugin or module files.

4. Compatibility Problems with Plugins/Modules and Themes

In both WordPress and Drupal themes are used to modify the appearance and styling of a website and plugins or modules are used to modify how the software works. Some parts of themes and plugins/modules interact with pieces of code found in the core software. If you hack core, it is possible that you could modify something that interacts with a theme or plugin/module you are using and that this could cause unforeseen incompatibility issues. Again, troubleshooting these issues will be extremely difficult because your configuration will be 100% unique.

When it comes to core, there is no benefit in being your own unique snowflake.

5. That’s What Plugins and Modules Are For

Most of the time when people make changes to core, they are doing so because they want to change or add functionality to the software. This goal of modifying and extending the functionality of your content management system is exactly why plugins exist for WordPress and why modules exist for Drupal. Chances are you may be able to find an existing plugin or module that will add the functionality you’re looking for to your site. If you can’t find exactly what you want in an existing plugin or module, then best practices are to code your own custom plugin or module.

What about themes, plugins, and modules?

As with core, best practice is to not make changes to theme or plugin/module files. The underlying reasons for this are basically the same as the reasons why it is bad to hack core: updates will overwrite your changes and you may unknowingly introduce security vulnerabilities.

There are two generally accepted approaches to theme development: using a starter theme to create your own 100% customized theme or using a base theme and creating a child theme that overrides the base theme.

If you are using a plugin or module and you absolutely need to modify the code in order to get the functionality you need for your site, fork the plugin and create your own custom version. This will prevent future updates to the plugin from overriding your changes.

Conclusion

Hacking core is simply changing the core files for WordPress, Drupal, or any other widely used open source content management system out there. The place to make modifications to the way WordPress or Drupal looks is in your theme files. The way to make modifications to the way WordPress or Drupal works is with plugins and modules.

At the end of the day, never ever hack core. Never.


CSS Transforms: The Basics

Linguistically speaking, a transform is a “change in form, appearance, or structure,” at least according to the folks over at Dictionary.com. When it comes to CSS, the Mozilla Developer Network describes a transform this way:

“The CSS transform property lets you modify the coordinate space of the CSS visual formatting model. Using it, elements can be translated, rotated, scaled, and skewed according to the values set.”

What exactly does this definition mean? In a nutshell, CSS transforms change an element so that it’s form and visual appearance is modified. There are four basic types of CSS transforms that modify an element in different ways: rotate, scale, skew, and translate. Matrix, another type of CSS transform, is an advanced type of transform that is beyond the scope of this post.

Transforms: Syntax

The syntax for applying a CSS transform to an element is the same regardless of the specific transform function you want to use. The transform property allows for multiple transform functions to be included in one line of code. The default value of the transform property is none.

No Transforms

transform: none;

One Transform

transform: <transform-function>;

Multiple Transforms

transform: <transform-function> <transform-function> <transform-function>;

Rotate

The rotate transform function behaves exactly as you expect it will and allows you to rotate an element clockwise from its current position. Counter clockwise rotations can be achieved by using negative values.

Syntax

The specific syntax for a rotation is as follows. Angles are expressed in the format (5deg) or (-5deg), for example.

transform: rotate(angle);

Example

All examples in this post will use the following HTML and CSS to demonstrate the original state of the element before the transformation function has been applied. Any additional sample code will only account for the transform itself.

<div class="box"><i class="fa fa-smile-o"></i>
</div>
.box {
    width: 3em;
    height: 3em;
    background: #ca0164;
    color: #ffffff;
    text-align: center;
}

.box .fa {
    font-size: 2em;
    line-height: 1.45em;
}

Example: Rotate 25 Degrees to the Right

.box {
	transform: rotate(25deg);
}

Scale

The scale transform function does exactly what you’d think it might do and scales an element relative to its original size. The values specified within scale transforms are unitless and should be thought of as a multiplier.

Syntax

There are three different variations on the syntax for the scale transform function since an element can be scaled on the X axis, the Y axis, or on both axes.

X and Y axis Scale

In this format, if only valueX is specified, valueY is assumed to be equal to valueX and the element is therefore scaled proportionately.

transform: scale(valueX, valueY);

Just X axis Scale

transform: scaleX(valueX);

Just Y axis Scale

transform: scaleY(valueY);

Example: Shrink to half size

.box {
	transform: scale(0.5);
}

Skew

The skew transform function shifts  an element along the X and/or Y axis by an angle value.

Syntax

An element can be skewed along the X axis, Y axis, or along both axes, but there are only two valid syntax structures for this type of transform. You’d expect that there would be a compound format similar to that for the scale transform function to address the transform of the X and Y axes in the same function, but that particular structure is no longer in the CSS specification and should not be used.

Just X axis Skew

transform: skewX(angleX);

Just Y axis Skew

transform: skewY(angleY);

Example: Skew left

.box {
	transform: skewX(25deg);
}

Translate

The translate function moves an element vertically and/or horizontally relative to its current position. Positive values will move the element right on the X axis or down on the Y axis. Conversely, negative values will move the element left on the X axis or up on the Y axis. Any generally accepted length value can be used (pixels, ems, etc.).

You might be wondering: Why would you use translate when you can use more established CSS standards for layout and formatting? In general, you should never use the translate function for basic layout needs. Instead, think of translate as a more efficient way to move an element’s placement in a transition or animation.

Syntax

The syntax for the translate transform is nearly identical to the syntax for the scale transform function and accounts for the ability to translate an element along the X axis, Y axis, or both axes.

X and Y axis translation

transform: translate(valueX, valueY);

Just X axis translation

transform: translateX(valueX);

Just Y axis translation

transform: translateY(valueY);

Example: Move Box to Bottom Right

.box {
	transform: translate(3em, 3em);
}

Browser Support

CSS transforms are supported in all major browsers including Internet Explorer 9 and above. There are a handful of browser prefixes that are required for full cross-browser support (listed below).

It’s also important to note that 3d transforms are coming and can be used in a lot of browsers now, but they are only partially supported in IE10 and 11. Once Internet Explorer has more widespread support for 3d transforms, the universe of what is truly possible with CSS transforms will expand even further.

Prefix Requirements

  • -ms-
  • -webkit-

SEO and Mobile-Friendliness

Google recently announced on their blog that starting April 21, 2015, the mobile-friendliness of websites will have a significant impact on search results. How does Google define “mobile-friendliness” and what are the implications of this change on design for the web?

Mobile-Friendliness

On a basic level, Google is defining a mobile-friendly website as one that is “readable and immediately usable” and does NOT require a user to pinch or zoom in order for the content to be legible or for the site to be navigable.

To find out whether Google views your site as mobile-friendly, run your URL through their Mobile-Friendly Test. If you have Google Webmaster Tools set up on your site, you can use the Mobile Usability Report to get a full audit of potential mobile usability issues across your site.

Mobile-Friendly Site Configurations

There are three site configurations that Google recognizes as mobile-friendly: responsive web design, dynamic serving, and separate URLs.

Responsive web design uses the same HTML on all screen sizes. CSS media queries are used to change the format of the content at different widths. “Responsive web design is Google’s recommended configuration,” according to part of their getting started with mobile manual.

Dynamic serving changes the HTML and/or CSS that is served to the browser dependent on the device. On the face of it, this sounds like it might promote a more optimal user experience than responsive web design, but it is impossible to guarantee that the website will be able to correctly identify the device on which it will be served, which can lead to literal crossed wires that will serve the wrong version of the site to a particular device.

Using separate URLs for desktop and mobile versions of the site is one of the oldest ways of serving content optimized for mobile devices. This type of configuration usually uses the format sampledomain.com for the desktop URL and m.sampledomain.com for the mobile URL. This strategy can suffer from the same user-detection agent problems as sites that are structured to dynamically serve the content. Additionally, this strategy also requires maintaining two versions of the website, one for each URL. This is disadvantageous because such sites can be quite difficult to maintain and because having more than one URL can dilute search engine results since multiple domains are being crawled for each page.

Implications on Design

So what does all of this mean in terms of design considerations? In general, the new mobile-friendliness standards by which Google will be judging websites are reflective of responsive web design best practices that have been considered standard for years.

Some key design elements that should always be taken into consideration from a responsive design and SEO perspective are:

Content Reflow

All content should reflow as necessary to fit the viewport well regardless of width. This includes images and videos, both of which should never flow beyond the available screen real estate. Additionally, absolute widths should be avoided in favor of percentage widths for all elements on the page as absolute widths may cause overflow past the viewport on some displays. Media queries should be used as necessary to reflow content as screen width changes.

Speaking of the viewport, a meta tag should be added to the head of the document that specifies width=device-width and initial-scale=1 like so:

<meta name=viewport content="width=device-width, initial-scale=1">

Typography

Google has very specific recommendations when it comes to typography for the web. Of course, variations on these guidelines may be necessary when it comes to a particular font, but in general, Google recommends the following:

  • Use a base font size of 16 CSS pixels. Adjust the size as needed based on properties of the font being used.
  • Use sizes relative to the base size to define the typographic scale.
  • Text needs vertical space between its characters and may need to be adjusted for each font. The general recommendation is to use the browser default line-height of 1.2em.
  • Restrict the number of fonts used and the typographic scale: too many fonts and font sizes lead to messy and overly complex page layouts

Tap Target and Link Sizes

A “tap target” is a button, navigational item, or link on your website.  These targets should be large enough on mobile to promote ease of use by site visitors. Google recommends that the most important targets be a minimum 48px wide and tall and that there be ample space (about 32px) between targets. Less important targets and links can be smaller, but they should still be spaced far enough apart so that a user’s finger can easily tap on one link without accidentally tapping another link.

Conclusion

The changes to Google’s search algorithms that will reward so-called “mobile-friendliness” are reflective of mobile usability best practices that have emerged since the debut of smartphones in the market. If you’ve already been designing and building websites with responsive design principles and an eye towards usability of those websites on mobile devices, they will likely pass Google’s Mobile-Friendly Test with flying colors. If there are still a few fixed width websites that you maintain, these latest changes to Google’s algorithm may help provide a business rationale for retrofitting or redesigning these websites.

Establishing Project Requirements for Personal Blog Projects

As I’ve previously described, I am planning to design and build my own theme for Responsive Geometry from the ground up. Now that Responsive Geometry exists, the next step in the process is defining project requirements that will help guide the design and development process. There are six major questions I’m asking myself:

Visual Identity: What kind of look and feel do I want for the theme?

There is so much I need to explore to answer this question completely and much of that exploration is going to happen in the design phase of the project.

To start though, I answered a question that I’ve often seen used with clients. What are some adjectives that you would use to describe the look and feel of your future website? My adjectives include:

  • bright
  • clean
  • intricate
  • colorful
  • welcoming
  • sleek

Search engine optimization: What design elements do I need to incorporate in order to make having great SEO achievable?

Google has recently announced that they are changing their search algorithms in a few weeks to award mobile friendly website formats in search results. There are a few design implications to consider as a result of these new Google-established parameters. To be clear, since the dawn of responsive websites, it has always been a good idea to consider the following requirements:

  • Content should reflow to fit the width of the device.
  • Elements such as images or videos should change width as necessary so that they never flow beyond the available screen real estate.
  • Media queries should reformat content as screen width changes.
  • Google recommends a 16px base font size.
  • Typographic hierarchy should be defined relative to the base font size.
  • Make sure that text has reasonable line heights.
  • Use a restricted number of font faces in the layout.
  • Make sure any “tap targets” are sized appropriately (minimum 48px wide and tall for your most important targets) on mobile. There should also be ample space (about 32px) of space between targets.

Aside from pure design considerations, there are a number of best practices that should be incorporated into the code and content structure as well, including the following.

  • Use alt tags for all images.
  • Make sure post titles use <h1> tags and that header structures are used hierarchically throughout the content.
  • Use breadcrumbs that reflect category structures.

Content: What types of content formats will I need to account for?

Since Responsive Geometry is intended to be a blog that covers both design and code related topics, there are a number of specific content pieces that I want to make sure I account for in terms of design. I want to make sure design patterns are considered for the following content pieces:

  • a standard blog post
  • a tutorial
  • a code snippet
  • a screenshot
  • an author biography
  • a collection of related posts
  • a category page

User experience: What are the user goals for visitors to the site?

More than anything else, I want site visitors to be able to find what they are looking for easily. I want navigation and content structure to be logical and to support a visitor’s individual goals when they are looking for something on the site.

I also want users to be able to interact with the content in a meaningful way if they so choose. I want to make sure commenting on a post or sharing it through social media is easy and accessible.

Accessibility: What do I need to do to provide the best experience for all visitors?

I want to make sure that I build a website that is as accessible as possible because inclusivity of all people who access the internet is really important to me. As such, I’m going to try my best to comply with The Accessibility Project‘s Web Accessibility Checklist.

Browser compatibility is also a huge accessibility consideration. As such I’ll aim for graceful degradation in terms of my code and I’ll test my final theme in Internet Explorer 9+, Chrome, Firefox, Safari, Opera, and mobile browsers on iPhone, iPad, and Android.

Integrations: Are there connections to other software that I need the site to have?

This is a question I ask of project managers and clients before embarking on any web build.

In the case of Responsive Geometry, the answer to this question is simple: I want the website to integrate with Mailchimp so that users can sign up for emails. Otherwise, I can’t think of any other integrations the site will need.

Conclusion

Systematically thinking through project requirements for my own projects is not something I’ve done before, though the exercise of writing this post has taught me that I should. Though many of the items I outlined here are reflective of the approach I typically take to building websites, I think it is going to be infinitely helpful to be able to refer to these requirements as I move to the information architecture phase of the project.

Do you usually determine requirements for your personal projects or do you tend to jump right in? I’d love to hear your thoughts on this topic in the comments!

Styling Bulleted Lists with an Icon Font

Though the classic bulleted list is perfectly utilitarian in many circumstances, sometimes we need to present bullets that are a little more graphically variant than the list styles disc, circle, and square. In this tutorial, I’ll walk you through styling bulleted lists using an icon font and CSS to create custom bullets.

Step 1: Install an icon font

We’re going to use Font Awesome as our icon font for this tutorial because it is freely available and has an awesome number of icons available (pun intended). Follow the instructions on their handy getting started page to install the Font Awesome icon font on your site.

You can use whatever font icon set you want to accomplish a similar effect, so Google away if you’d like to find some alternatives. I am also a huge fan of making custom icon fonts using Icomoon.

Step 2: Make a List

To ensure that the styling for our fancy list does not interfere with the styling of any other lists that appear on the page, I’m going to give our list a class of “fancy-list.”

The Code


<ul class="fancy-list">
<li>list item one </li>
<li>list item two </li>
<li>list item three </li>
</ul>

Output

  • list item one
  • list item two
  • list item three

Step 3: Remove the Standard Bullets

Now we need to remove the default bullet styling. We’ll do this by setting the list-style to “none” in our CSS. Additionally, I am adding some basic text formatting to govern the font and font size of the list text.

The Code


ul.fancy-list {
font-family: arial, sans-serif;
font-size: 16px;
line-height: 20px;
list-style: none;
}

Output

  • list item one
  • list item two
  • list item three

Step 4: Add the Icon Bullets

We are going to use the CSS pseudo-class :before and the content selector to place a star icon () before each list item.

To do this, we need to call the unicode key for the icon you want to use through the content selector. You’ll need to place a backslash (not a forward slash) before the unicode key in order for the character to render properly in the browser. In our example, the unicode key for the star character in the Font Awesome family is f005. You can find the unicode information for each Font Awesome icon on this cheat sheet or on the page for each individual icon.

In order for our icon to actually appear, we also need to define the icon font to be the font family for the pseudo class content. In this case, the font name is FontAwesome. I am also defining a color to make our stars orange.

The Code


ul.fancy-list li:before {
font-family: FontAwesome;
content: "f005";
color: #F5B54B;
}

Output

  • list item one
  • list item two
  • list item three

Step 5: Adjust Icon Size

Things are starting to look pretty good, except for the fact that our star is out of proportion to the text in our list. We’ll adjust the size of the icon by using font-size, just like we would to style the size of any other font.

The Code


ul.fancy-list li:before {
font-family: FontAwesome;
font-size: 9px;
content: "f005";
color: #F5B54B;
}

Output

  • list item one
  • list item two
  • list item three

Step 6: Adjust Spacing

We’re almost there! Now we just need to adjust the spacing so that there is some space between the star and the text and so that the star is vertically centered to align with each line of text.

Adding margin-right: 5px; adds the space we need between the star and the text.

Addressing the vertical centering of the star is a bit more tricky. You might think that adding padding-bottom or margin-bottom would work, but this actually adjusts the vertical placement of each list item AND the star. In order to control the placement of the star independently, we need to set position: relative;. Then, we can set the bottom property to whatever value places our stars in the right place.

The Code


ul.fancy-list li:before {
font-family: FontAwesome;
font-size: 9px;
content: "f005";
color: #F5B54B;
position: relative;
margin-right: 5px;
bottom: 2px;
}

Output

  • list item one
  • list item two
  • list item three

Conclusion

Pulling in font icons through CSS is one way I’ve discovered to create consistent and graphically variant styling of bulleted lists. This technique is flexible across pretty much any icon font, including those you create yourself. Best of all, this technique is supported in modern browsers (though you may come across some issues with IE8).

A Developer’s Theme Design Plan

Responsive Geometry will be a blog about the intersection of code and design. My skills are primarily in front end development and day to day I typically code and interpret designs other people have created. With this project, I am challenging myself to explore skills outside of my typical workflow and one of the ways I will do that is to create the theme design for Responsive Geometry myself.

I’ll be blogging about the theme design process every step of the way and will add links to each related post here as I go.

Here is my initial plan:

Step 1: Actually Publish a Blog

I’ve been brainstorming material for this blog for months, but haven’t published (or actually finished) any of the posts I’ve begun writing because I kept hitting a mental block in terms of how the blog should be structured and what it should look like.

Lest I be plagued by formatting indecision forever, I decided to start by using WordPress’s lovely new Twenty Fifteen Theme. I tweaked a few colors and changed some of the sidebar widgets, but otherwise I am going to let it be so that I can focus on blogging and on the theme design process.

Step 2: Create Project Requirements

Before I make anything, I need to define a clear list of requirements for the theme. Considerations I’ll need to address at this stage include:

  • Visual Identity: What kind of look and feel do I want for the theme?
  • Search engine optimization: What design elements do I need to incorporate in order to make having great SEO achievable?
  • Content: What types of content will I need to account for?
  • User experience: What are the user goals for visitors to the site?
  • Accessibility: What do I need to do to provide the best experience for all visitors?
  • Integrations: Are there connections to other software that I need the site to have?

Step 3: Make Information Architecture Decisions

First I’ll map out the website’s structure in a site map. I’ll ask myself these questions as I produce my site map:

  • How will blog posts be organized?
  • Are there other sections or pages I need to include?
  • What will the hierarchy of content be?

Once I have a solid site map, I’ll build out a few wireframes to define how the content hierarchy will map to the screen and to define how the user will be able to navigate and interact with the content.

Step 4: Design Something

I’m planning to start the visual design process with a lot of brainstorming and sketching. Once I have some solid ideas to work from I’ll design the logo first. Then I’ll work with style tiles to establish color palettes, typography, and other branding elements. From there, I’ll create a full-fledged mockup of the homepage, a standard blog page, and any other layouts I deem necessary. I am planning to design (and code) mobile first to make sure that screen real estate is well considered at all widths.

Step 5: Get Design Feedback, Revise, and Repeat

I’ve enlisted two designers that I trust to critique my designs once I’ve got something to show. Critiques can be soul-shakingly terrifying, but are critical to learning to be a better designer (or developer!).

I am expecting that my trusted designer friends are going to have lots of feedback and that I’m going to revise and revise again until I arrive at a theme design that I’m happy to move forward with. I am giving myself a maximum of three rounds of revisions in an attempt to ensure that there is a defined endpoint for this stage of the process. After all, we are all our own worst clients, right?

Step 6: Build It

Once I get to the build phase I will have the following deliverables to work from:

  • Site map
  • Wireframes
  • Style tiles
  • Mobile and full-width mockups of the homepage and a blog post page

My theme will be built for WordPress because it’s a platform that I love developing for and because I believe it is optimized for blogging over other competing content management systems.

Step 7: Create Style Guide

Websites are inherently iterative and in order to prevent future code bloat, formatting inconsistencies, and new sections that don’t quite fit with the theme I’ll put together a style guide at the conclusion of the project. This guide will define the grid, typography, colors, button and image styling, logo usage, etc. for the website. This way, when I return to the theme in the future to make additions to the site or when I create designs for elements outside of the theme (email templates, social media art, etc.) I’ll have a clear set of defined design decisions to work from.

Conclusion

I am 100% positive that this plan for developing a theme for Responsive Geometry will need to be adjusted as I go along. What challenges have you experienced designing for your own projects? Do you have any advice for developers who are working on honing their design skills? Leave your thoughts in the comments!