test
On Setting My 2019 Goals
I’m the sentimental type that takes a new year very seriously. There is something about the natural pause at the holidays that makes goal-setting, planning, and otherwise organizing seem so natural.
I did not make goals for 2018. As 2017 turned into 2018 I was preoccupied with recovering from the trauma associated with a life-threatening medical complication during my pregnancy only to have my February due date child born just a few days into 2018. On a day when I had no less than seven meetings scheduled!
The biggest thing I learned from not setting goals is that when you don’t have goals established, you don’t have guideposts to help you systematically evaluate your situation in order to make changes. It’s impossible to tell whether you’ve succeeded or failed and all too easy to assume that you must be a failure.
And I did. In my mind I was one big massive failure.
For the first time in my life I wasn’t able to put all of my extra time into making sure everything I did professionally was absolutely perfect. To me, every little flaw was magnified, compliments were ignored, anything that might be an accomplishment wasn’t recognizable. I lost my confidence. I was a failure, or so I felt.
By any other year’s standards, professionally, I was a failure. In 2018 I built fewer websites than I have since I began working professionally as a web developer, I spoke in public only once – a repeat talk at my local meetup, I had a hard time keeping up with the developments around CSS grid, Gutenberg, the GDPR, and JavaScript. I became isolated: I went to only two meetings of the WordPress team that I’d led through the end of 2017 and my attendance at conferences or other meetups and trainings was at an all time low.
The thing is though… I wasn’t a failure. Not even close.
I very suddenly became the parent of a late-preterm baby who needed extra special care in the NICU and then, just when things were starting to seem “normal”, that pesky life-threatening issue I’d had during pregnancy came back and I needed to have surgery again.
2018 was an exceptional year. In spite of the fact that I was learning how to be a parent, that I was in a significant amount of pain for a large portions of time, and that I was recovering from trauma, my business and my skills didn’t die. I let go of my unpaid commitments and I maintained my skillset through the work I was doing. It wasn’t until recently that I could see it: in spite of very difficult life circumstances I remained committed to my existing clients, I worked hard on their behalf, I added a few new clients, and I made enough money to stay self-employed.
Did I spend lots of time volunteering on open-source projects? Did I build new skills in my free time? Did I push myself professionally? No, I absolutely did not. And that is OK. My life demanded other things from me in 2018. Sometimes life happens instead of ambition. Health and loved ones, those key components of life, are always going to be more important.
I am not preoccupying myself with all of the hard things that happened: they happened and they are over. It’s my job to live and dream now, both personally and professionally. For 2019, I am making goals again. They are across a range of categories:
- environmental
- family
- financial
- health
- personal
- professional
- relational
One of my most important learnings from this last year is that ambition shouldn’t be confined just to professional, public pursuits. I’ve always made goals in other categories, but the professional goals tended to push out goals like “read x number of books” or “exercise 3-4 times per week.” In the moment, I’d prioritize hitting a client deadline over reading before bed. While this can make sense in certain situations, this choice became my default.
The flight attendants are right though: you need to put on your own oxygen mask before putting masks on others. I know that if I don’t fuel myself up with good food, exercise, time with my family, and time to relax, I won’t be of much use to my friends, clients, and family. That recharge is important. If I’ve got it, I can be efficient with my work. If I’m not coming from a place of healthfulness and calm, I won’t work as well.
And so, in 2019, I’ll have benchmarks established to be able to see if I am moving forward in the way I’d like to in ALL aspects of my life. This way, in six months I’ll be able to tell if I’m making progress towards these benchmarks or not. I’ll be completely happy with unmet goals if I can see why they couldn’t or shouldn’t have happened. The goals aren’t there to be achieved, they are there to establish a path that very well may change along the way. In the end, it’s the path that is important, I just need to make sure that the path is leading somewhere.
My Favorite Browser Extensions for Web Development
The very first time I expressed interest in learning how to modify the code on websites, my mentor exclaimed “well first, you need to get Firebug!” I had no idea what she was talking about, but googled Firebug nonetheless and installed my first browser extension. Ever since, Firebug has been a tool that I’ve used nearly every day either in my work as a developer or out of curiosity to inspect how other websites have been built. Very recently, it was announced that there will be no further development of Firebug, so I’m getting more cozy with my second choice browser inspector (Chrome’s native inspector). Firebug will always have a special place in my heart and I am still quite sad about its demise.
Browser extensions are little applications that add additional functionality to a web browser. This is analogous to how a plugin might extend the functionality of a WordPress site. I spend most of my time working in either Firefox or Chrome, depending on what tools I need to use in the moment. In Firefox browser extensions are called add-ons and you can search for and install them by clicking on the menu icon and then choosing “Add-ons.” In Chrome you can find and install browser extensions at chrome://extensions/.
I’ve tried out lots of browser extensions over time and most don’t stick around in my workflow. Web development is a craft and it’s important to use tools that support the workflow that works best for you. Which browser extensions have turned into indispensable tools in my toolbox? These are my favorites:
1. ColorZilla (Firefox and Chrome)
There are lots of browser extensions out there to inspect colors in websites and I have tried quite a few of them. At some point, Colorzilla became my favorite, mostly because it works in a way similar to the way the eyedropper works in Photoshop or the dearly departed Fireworks (design software that Adobe discontinued after its 2012 release) . When you hover over a site with the ColorZilla eyedropper activated, the tool shows you the RGB and hex value for the color as well as the HTML selector that is generating the color. There are also some built in tools for exploring related colors and generating CSS gradients.
2. MeasureIt (Firefox and Chrome)
MeasureIt is a really simple tool that enables a draggable ruler on top of any webpage that allows you to measure things or check alignment of elements on a page by providing a reliably horizontal or vertical rule. I have only used the Firefox version, but it appears the same developer has made an analogous tool for Chrome. I’ve seen other measuring tools out there and have also totally held up pieces of paper to my screen to make sure things are aligned. That being said, I’ve found that MeasureIt is generally the easiest tool to double check spacing and alignment.
3. WAVE Evaluation Tool (Chrome)
It’s our responsibility as developers to build websites that are accessible and the WAVE Evaluation Tool helps to automate discovery of common accessibility issues. This tool is not a replacement for manual testing, but when used in advance of manual testing it saves a huge amount of time. In addition to visual alerts to potential problem locations on a webpage, WAVE also tells you specifically why it flagged each item, which makes it infinitely easier to correct the issues that it has found.
4. Awesome Screenshot: Screen Capture and Annotate (Firefox and Chrome)
Awesome Screenshot is the newest tool on my list. I found it as I was looking for a new annotation tool after I learned that Skitch was being killed off by Evernote. There is a premium version of this extension, but thus far the free extension for Chrome has been all I’ve needed. In addition to allowing you to annotate your screenshots, Awesome Screenshot lets you take a screenshot of a full webpage, including what is hidden “below the fold.” I have found that the combination of a full page screenshot with annotation capabilities has been infinitely helpful in communicating with clients, project managers, and designers while collaborating on projects.
Though these are the most commonly used tools in my browser extension toolbox, I do regularly try out new extensions that look like they could be useful. I have found that it is really important to consistently evaluate my tools to make sure that I am working as efficiently as I can. What browser extensions do you use the most? Let me know in the comments!
2016 Year in Review
Early in 2016, I left my job, became self employed, and never actually announced that fact to the world. Here’s why: It’s scary. Terrifying, in fact.
At first, I didn’t share because I was adjusting in the same way anyone with a new job adjusts. I had left my full time job as a senior web developer at an agency to work part-time rebuilding the technical infrastructure of a non-profit I am passionate about. They had been repeatedly targeted by hackers, and so those first few weeks were spent full-time fixing the biggest security holes. At first, it felt like I just had a new job.
I became preoccupied with setting up a business, which, turns out, is confusing to do in the District of Columbia. Then, I started taking on other clients while setting up administrative structures for myself. All of these logistical parts that have nothing to do with my skillset overwhelmed me. I wondered if I could figure out small business administration, if I could make enough money to make this adventure sustainable, if I could really do everything I wanted to do on my own.
I had a lot of self-doubt (imposter syndrome is real!) and the part of me that is really shy encouraged me to keep to myself while I got used to what I was doing. At the same time, I appeared on WP RoundTable, which was the first public indication that I was self-employed.
Meanwhile, I realized something really important: I loved my clients. Big love. Unicorns jumping on rainbows love.
I was happier than I’d been in years.
It was feeding my soul to work on projects that are focused on making the world a better place. Every day, I was delighted to work with my talented, passionate, amazing clients.
I traveled a lot to attend conferences and spoke quite a bit (WordCamps Lancaster, Northeast Ohio, New York City, Pittsburgh, Baltimore, and US). The total quantity was perhaps too much for my homebody self, but I absolutely love teaching through public speaking and enjoyed every second of these trips.
WordCamps have been a constant in my life for years now, as have the WordPress Training Team, the WordPress DC Meetup, and DCFemTech. I can not explain how much I adore the people in these communities. For me, 2016 highlights from these areas of my life include the training team building out their first full workshop, speaking at the DC meetup about one of my favorite topics: color, leading a workshop for the Women’s Information Network on getting into WordPress, helping organize DCFemTech’s very first Inspire event, and helping organize DCFemTech’s second annual Hack for Good. Dear friends in these communities also connected me with opportunities to my very first guest blog post for Design TLC and do an AMA for ManageWP.
The support of these communities, friends, and family buoyed my spirits in the times when my confidence dipped. And it did dip: there is nothing like being totally on your own to cause self-doubt. In spite of this, not once did I feel lonely in 2016, even though I spent most of my time working by myself. When I felt discouraged, tired, or otherwise doubted myself, I’ve been so thankful to have people in my life who help pull me back into a productive place.
I worked more in WordPress and less in Drupal. I ended the year with an 80% WordPress/20% Drupal split in work, which is exactly the opposite of what this distribution looked like in 2015. In doing so, my skills as a WordPress developer grew tremendously, which was a larger goal I’d had for the year.
Consciously leaving the security of full-time employment is easily the biggest professional risk I’ve ever made, but is also perhaps the best thing I’ve ever done. In 2016 I worked with many of my favorite people from all parts of my life and career. I worked with designers who pushed me technically and projects that presented new problems. I am a better developer, project manager, and all around problem solver than I was a year ago.
I got over being afraid of being self-employed and started to revel in the possibilities of it.
So what’s next?
In 2017 I want to focus on expanding past client work. Don’t get me wrong, I am still doe-eyed in love with my clients and intend to keep supporting them and working as a developer. It’s just that I also want to spend more time writing, speaking, and teaching. My clients and others I’ve met this past year have helped crystallize something I already knew: web development and the internet spark a lot of anxiety in people who are trying to learn to code or who are trying to manage their websites. I love working with these people so that they are empowered with the tools and skills they need and I want to do more of that work outside of my one-on-one client engagements.
With that, stay tuned! I’ll be blogging regularly in 2017 and also have a few other projects sitting in the wings. I’d love to have you along for the ride, so please consider being one of the first to join my brand spanking new email list!
What are your plans for 2017? Let me know in the comments!
Organizing a Hackathon (Again)
A week and a half ago we held the second Annual DCFemTech Hack for Good, which I had the pleasure of planning along with Ally Palanzi, Alex Ulsh, and Cat Robinson. We also had some help from other DCFemTech folks, especially Shana Glenzer, who helped us connect with contacts at the venue and with some sponsors. Last year, Ally wrote a great recap of our experiences planning our first hackathon, and I totally had planned to write down my own thoughts too. Life got in the way and I didn’t, but here are some new and different lessons I learned this year!
Find a Great Team, Keep Them, and Trust Them
Last year Ally wrote about how our engaged and hardworking team was the key to our success and I’d say that is still true. This year we had three organizers from last year’s event return and we added a new organizer whom we’d actually met at last years hackathon. The keys to this group working well to organize an event are:
- Knowledge of and optimization for individual strengths. We’ve fallen into a groove where each organizer is focused on the pieces of the event where they are the strongest. It would totally stress me out to do some of the pieces handled by other co-organizers and they have told me the same is true for pieces of what I contribute. This year Ally focused on sponsors, food, and promotion; Cat made all of the art, made and managed the registration, helped with promotion, and did a lot of the public speaking; Alex organized the pre-party and did pre-planning to make sure each project was set up from a technical perspective going into the event; I was the primary liaison with the venue (thank you again OCTO!) and also communicated with the non-profit and community groups to set up and scope out projects in advance of the hackathon.
- Trust. In the time that we’ve been planning this event together, this team has developed a great degree of trust in part because we’ve gotten to know each other. We are able to pinch hit for each other when necessary both during and prior to the event. We also communicate consistently throughout the planning process so that we all know where things stand. That all being said, we don’t over-communicate either – there are no lengthy and pointless meetings with this group!
- Communication. This year we communicated primarily through Slack and Google Hangout. Slack was awesome as we were able to have real time conversations to make decisions and collaborate as a group. We operate with a lot of transparency and generally make decisions through consensus (even when the consensus is: we trust you, do what you think is best!).
Remember the Lessons from Last Time
It is easy to plan an event, acknowledge what went right and wrong, and then have that memory be fuzzy when you go to plan the same event again. Last year we made a few decisions that were unorthodox for a hackathon, but that absolutely helped make last year’s event awesome. Thanks to Ally’s blog post that documented everything, we had a reminder of what those things were and chose to keep these elements as part of the event:
- Contribute and learn, rather than compete. Have projects where the aim is to help a community group/organization, not win prizes. We found that the project briefs I had scoped out for last year worked exactly as intended to contain the goals of each project to something that would be possible to do in a weekend. We recycled the same process/format for this year.
- Keep a low pressure schedule. Healthy habits are part of our goal, which is why the actual “hacking” time for our event last year and this year was from 9:30am-4pm each day.
- Value inclusion and diversity. Hack for Good is open to all participants, but by putting the event out under the DCFemTech banner, by using images of women in promotional materials, and by reaching out to networks that focus on pulling women from all backgrounds into tech, we ended up with a diverse group that was approximately 95% women and included folks from lots of different backgrounds and skill sets.
We also had a few adjustments that we made from our observations of last year’s event and we had one idea from last year that we thought about again and rejected. The adjustments we made were:
- Plan technical set ups for projects in advance of the event. A failure to plan technical workflows for the groups was one of the largest issues at last year’s event because figuring out this piece cut into work time for the projects. This year, Alex did an amazing job of setting up different tools and workflows that would support each project.
- Using a different platform for event registrations. This year we used nvite for registration rather than Eventbrite. By using nvite, Cat was able to really design the registration page, which made us look more professional and polished. We also used nvite’s tools at the event to keep a record of who attended.
- Plan more projects. We realized that with the growth of DCFemTech and the larger women in tech community over the last year that we may have greater attendance this year than we did last year. We aimed to have 4-5 projects scoped in advance this year (last year we had 3) to account for our projected numbers.
- Order less food. This year we ordered proportionately less food than we did last year. This year, Ally ordered enough food for about 60% of those who registered, which was plenty for those who attended, but cut down significantly on food waste when compared to last year. From the first hackathon, we learned that our drop off rate from those who registered to those who actually attended was around 40%.
- Following up after the event. We sent a survey out to the participants this year after the event. Last year we ran out of steam and didn’t do this, but totally should have. We’ve gotten a lot of great feedback that will help improve next year’s event already! This year I am also following up with the community groups who had projects at the event to make sure they have everything that they need. I did this with some groups last year, but it’s something I’ve systematized more this year.
The idea we had from last year that we rejected implementing this year was the idea of having a track of workshops for beginners. At the end of the day, we decided that such a track would detract from the projects and distract from the overall event. We did have a plan of who could give ad hoc workshops on different subjects, but we ended up not needing those. I still think it was a good decision to keep independent workshops out of the hackathon, though I do think it would be cool (and also a ton of work) for DCFemTech to do a full-fledged conference in the future.
New Ideas
This year we introduced a few new things into the event. These new things included:
- The pre-party. This year we held a pre-party at Mapbox. We had a great time and this was a fabulous way to kick off the weekend. Our participant survey will tell us more about whether we should keep this party as a feature of next year’s event!
- Use of Slack at the event. We ran into limits of how many people you can add to your free slack team at once, but otherwise using Slack at the event was a great way for project teams, organizers, and participants to keep in contact. Next year if we use Slack again we’ll need to stagger when we add folks to the team so we don’t run into issues of having enough invitations to get everyone onto the platform again.
Logistics
Space
This year we had an absolutely amazing space generously provided by the DC Office of the Chief Technology Officer (OCTO). We started and ended the hackathon in a big room where everyone could be together, but most of the hackathon was spent with project teams in break out rooms. There was also a kitchen/cafe area available to us that provided the perfect home base for food and snacks. Additionally, the venue was close to metro. We got lucky that this segment of the Metro was not directly affected by the Safe Track surges!
Food
In general, we aim for inclusive food at the hackathon. To do this, we collect self-reported dietary restrictions with registration so that we know what types of restrictions we need to account for with the food that we are ordering. In general, we try to have vegetarian, vegan, and gluten free options available, in addition to accounting for anything super specific that may come to our attention through the registration form.
Time and time again we’ve found Roti to be a great option for ordering food that takes into consideration the dietary considerations of attendees. Roti is also great at answering very specific questions about the ingredients in their food.
This year we made little signs to label each part of the lunch buffet so that there were indicators of what was vegan, gluten free, etc. Labeling the food did not take much effort, but definitely made the experience of eating at the hackathon more straightforward and easy for all.
Sponsors
The hackathon would not be possible without sponsors. Though all of the organizing work is done by volunteers, there is no way that we can conjure up space, food, and supplies ourselves. This year we were able to find a fantastic group of sponsors that made the event possible through a combination of cold calling and talking to folks we already knew.
One last time, a huge THANK YOU to the DCFemTech Hack for Good’s 2016 sponsors: @OCTODC @Mapbox @VoxProduct @Contactually @istrategylabs @WeddingWire.
Projects
Planning and scoping out projects for a hackathon like this one is hard because there are so many factors that you can’t really predict in advance ranging from the number of attendees to the skill sets of those attendees. When planning projects for the hackathon I’m looking for a few major qualifiers for each project:
- The community organization is in fact not-for-profit. Enough said!
- The community organization has a representative who is empowered to make decisions available to attend the hackathon. This has been absolutely vital to the project model working for this hackathon. With a key stakeholder present (technical or not) projects are able to move along more efficiently and a greater amount of productivity towards the goals of the project are possible.
- Clear project scope. Our goal is for attendees at the hackathon to be able to hit the ground running with the projects when they arrive. This means a lot of work thinking through what pieces of a larger project might be possible to achieve within the course of a weekend with volunteers.
- Diversity of technical skills required. Due to the unknown skill sets of the hackathon’s attendees, our goal with choosing projects for the hackathon is to find projects that have a wide range of technical skills required. We won’t take more than one or two projects that are technically similar to one another, even if the projects are otherwise a great fit.
- Realistic goals. We can not promise outcomes with the hackathon, but we make a good faith effort to make meaningful progress on the stated project goals.
One thing I’ve talked about for years now that we’ve never exactly pulled off the way I envision is having predetermined technical project leads for each project. I think this would help guide teams that have a mixture of experiences and skill levels. The main barrier to doing this is finding volunteers with the right skill sets for each project in advance who also have the time to shepherd a project throughout the hackathon.
Conclusion
There are so many ways this hackathon can grow and improve in the future, but at this point I’m proud that we’ve brought the hackathon from the nugget of an idea it once was to a real event where people learn, community groups are supported, and where lots of fun is had too.
Have you ever planned a hackathon? What are your tips and tricks for making sure all runs smoothly?
Dynamic CSS
The fundamentals of CSS transforms, transitions, and animation are the basics that allow front-end developers to kick it up a notch and add a bit more pizazz and interactivity to websites. What are the basic building blocks that make up these capabilities? What is the difference between a transition and a transform? What does browser support look like? Most importantly, how can you put these tools to use in your next project and where can you find good resources to learn more?
I’ve given two talks on this subject and have started to write about it as well. This post will store all of the links to resources I’ve created that explore the basics of how to add some of the more truly dynamic elements of CSS to our websites.
Blog Posts
Slide Decks
I am Writing a Book this November
Last year I failed to write a novel. I had every intent of writing a book and I even had an idea (think the results of apocalyptic consumerism encouraged by a greedy and controlling government). So, I signed up for National Novel Writing Month (NaNoWriMo) and gave it a go: I lasted two days.
I failed because I was trying to write a book that is fundamentally outside of what I read. The only novel of any kind I can think of that I have read in the last five years is Louise Penny’s Still Life, which I read because I was on vacation with my sister, who has read every single one of Penny’s mysteries. It was a great book and the perfect thing for me to read at the beach, but the reality is that when left to my own devices I read massive quantities of non-fiction.
This year, I signed up again, but I am going to defy NaNoWriMo convention and write a non-fiction book. My years of aspiring to write a novel have taught me that the goal of NaNoWriMo is overarchingly to get a first draft (at least 50,000 words) on paper in the month of November, so that is exactly what I am aiming for.
I have an outline of the book I am envisioning, but I have not done any research beyond sharing the outline with a few people to get their feedback. I have lots of questions. Will the amount of research that I’ll need to do be more or less labor intensive than my fiction-writing counterparts? Will the 1600+ words that I need to write per day to reach the goal be doable with my subject matter? Is 50,000 words a reasonable target length for my book or will it be shorter/longer? Will I have time to do this given all of the other personal and professional commitments I have in November?
NaNoWriMo also tells you to publicly commit to writing a book so that you’re holding yourself accountable to those you know. Last year I am pretty sure I told two people and that was it. This year, I am writing this post to force myself to be accountable. Writing this book is something I really want to do and so I’m sharing the goal with the world. I am not aiming for a complete, perfect, publishable book this month, but a first draft of something that I could polish and expand after November. I’ll report back in a month and report on how it went. I am determined to make sure that at that point, something of unknown quality and word count exists.
WordPress Redirection Plugin and Trailing Slashes
I am a huge fan of the WordPress Redirection plugin because I have found that it’s an easy way for non-technical folks to go in and set up 301 redirects so that all URLs are directing site visitors to whatever new content is appropriate. Recently, I ran into a small issue where some redirects that had been set up on a site I was migrating all led to 404 “page not found” errors. The reason? Inconsistent use of trailing slashes. What do I mean by a “trailing slash”? I’m referring to the slash ( / ) at the end of some URLs.
What Was Happening
Some of the redirects were working fine, but some weren’t. Upon closer inspection, I realized that some of the source URLs for the redirects had been set up without a trailing slash.
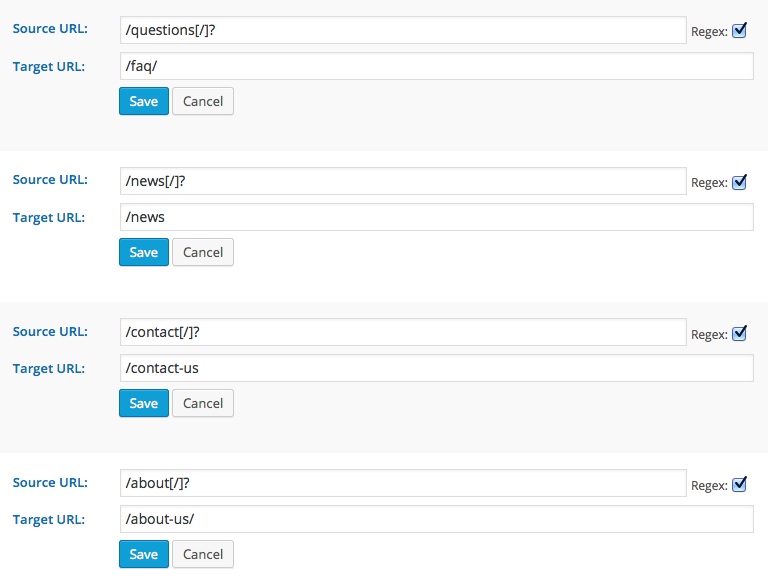
 In the screenshot above, I’m showing four possible combinations of source and target URLs in regards to the use of trailing slashes. Using a standard installation of WordPress with these scenarios will lead to the following results:
| Scenario | Result when navigating to the URL without a trailing slash. | Result when navigating to the URL with a trailing slash. |
| Source URL does not have a trailing slash and target URL does. | successful redirect | 404 error |
| Source URL has a trailing slash and target URL does not. | 404 error | successful redirect |
| Source and target URLs both do not have trailing slashes. | successful redirect | 404 error |
| Source and target URLs both have trailing slashes. | 404 error | successful redirect |
WordPress uses trailing slashes by default. If you go to any page on a standard WordPress site, remove that trailing slash from the end of the URL, and refresh the browser to go to this new version of the URL, you’ll notice that by default, WordPress reroutes traffic to URLs with a trailing slash. This means that with or without a slash, the target URLs we have set up will resolve to the correct URL.
With each test case we’ve set up in this example, we’ve learned that there are two patterns that lead to failed redirects:
- The source URL has a trailing slash, but the user navigates to the URL without a trailing slash.
- The source URL does not have a trailing slash, but the user navigates to the URL with a trailing slash.
Both of these scenarios make sense when you think about them in the context of how WordPress is set up. In both scenarios, the URL the user navigates to does not exist as far as the system is concerned, leading to the 404 errors. This means that the problem with these redirects lies with the configuration of the source URLs, not the target URLs.
The Solution
We need to make source URLs that account for the possibility that a user could navigate to the URL either with or without a trailing slash. We could make double the number of entries through the redirection plugin and manually specify each possible source URL, but this is a lot of work and could easily get unwieldy when dealing with lots of redirects. So, how should we set this up? Regular expressions to the rescue!
A regular expression (also known as a regex) is a text string that creates search patterns within a statement. Regular expressions are a broad and fascinating topic that are well beyond the scope of this post. For now, what we need to know is that the Redirection plugin allows for the use of regular expressions in setting up redirect queries and that we can use such a query to tell the browser that we’d like the source URL to redirect whether a site visitor inputs that URL with a trailing slash or not.
To make this work, we need to change two things in the set up of each entry:
- Check the “regex” box to tell the Redirection plugin that you are using regular expressions in the URLs you are entering.
- Add this code to the end of each source URL:
[/]?This simple regular expression is basically telling the website to use the redirect whether the source URL has a trailing slash or not.
With these changes, your redirects should all work if the site visitor inputs the URL with a trailing slash or not. In the admin interface, the redirects in this example would appear like this:
HTML Basics: Elements, Tags, and Document Structure
HTML stands for HyperText Markup Language and is the basic structural element that is used to create webpages. HTML is a markup language, which means that it is used to “mark up” the content within a document, in this case a webpage, with structural and semantic information that tells a browser how to display a page. When an HTML document is loaded by a web browser, the browser uses the HTML tags that have marked up the document to render the page’s content.
There are three types of code that make up a basic website page. HTML governs the structural elements, CSS styles those elements, and JavaScript enables dynamic interaction between those elements.
HTML structure + CSS style + JS interaction = web page
Elements and Tags
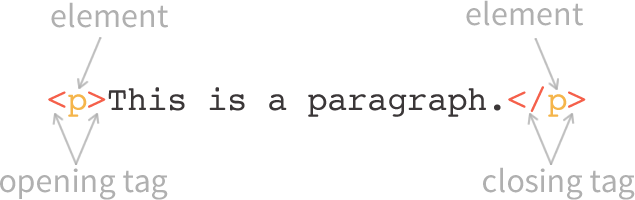
HTML elements and tags work together to mark up content. HTML elements indicate the purpose of a tag and tags indicate the beginning and the end of an element.
For example, here is a simple paragraph in HTML:
<p>This is a paragraph.</p>
The letter “p” represents the paragraph element. In this example, <p> is an opening tag that tells the browser that the content that follows it is a paragraph. The slash in the second tag, </p>, indicates that it is a closing tag that tells the browser that the paragraph element is ending and that any content that appears after it is not part of the paragraph. You may encounter serious display issues if you don’t remember to “close” each tag because the browser will interpret this pattern as meaning that the element identified by the opening tag should continue for the rest of the page.
You can find a full list of all HTML elements at the Mozilla Developer Network HTML Element Reference Page.
Basic HTML Page Structure
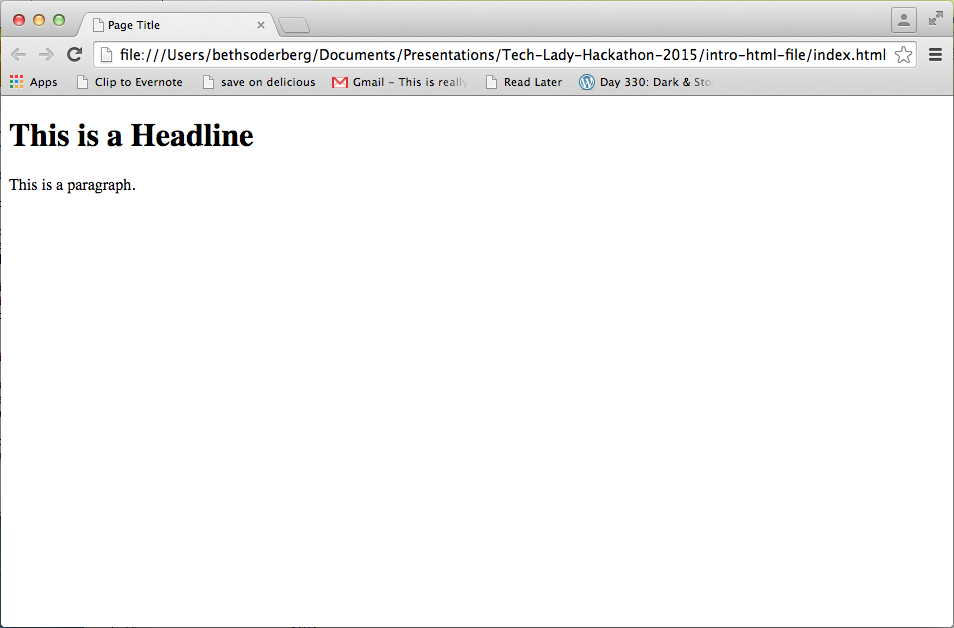
A basic HTML page is a document that typically has the file extension .html, though HTML frequently appears in the content of other file types as well. All HTML documents follow the same basic structure so that the browser that renders the file knows what to do. The basic structure on which all webpages are built looks like this:
<!DOCTYPE html>
<html>
    <head>
        <title>Page Title</title>
    </head>
    <body>
        <h1>Homepage Headline</h1>
        <p>This is a paragraph.</p>
    </body>
</html>
When this code is rendered by a browser, it will look like this:
Doctype
The first line of code, <!DOCTYPE html>, is called a doctype declaration and tells the browser which version of HTML the page is written in. In this case, we’re using the doctype that corresponds to HTML5, the most up-to-date version of the HTML language. There are a number of different doctype declarations that correspond to various versions of HTML.
HTML Root Element
Next, the <html> element wraps around all of the other code and content in our document. This element, known as the HTML root element, always contains one <head> element and one <body> element.
Head Element
The HTML head element is a container that can include a number of HTML elements that are not visible parts of the page rendered by the browser. These elements are either metadata that describe information about the page or are helping pull in external resources like CSS stylesheets or JavaScript files.
The <title> element is the only element that is required to be contained within the <head> tags. The content within this element is displayed as the page title in the tab of the browser and is also what search engines use to identify the title of a page.
All of the HTML elements that can be used inside the <head> element are:
Body Element
There can only be one <body> element in an HTML document because this element is the container that holds the content of the document. All of the content that you see rendered in the browser is contained within this element. In the example above, the content of the page is a headline and simple paragraph.
Nesting
You might have noticed that I keep referring to HTML elements as “containers.” This is because proper “nesting” is a key part of writing HTML that will work across all browsers, will render all content, will be readable by screen readers, and will be able to be targeted by CSS and JavaScript. In terms of HTML, nesting means exactly what you’d think it might mean: each element goes inside another element, just like nesting dolls are physically “nested” within each other.
For example, the basic page structure we outlined above is valid HTML because each element’s opening tag has a closing tag and fully contain any other elements within it.
I’ve used HTML comments to label the example we’ve been using to show which tags are opening tags and which tags are closing tags, so you can see how each element is nested. In HTML, any content that is in between <!-- and --> is a comment that will not be rendered by the browser.
<!DOCTYPE html> <!-- doctype declaration -->
<html> <!-- opening HTML tag -->
    <head> <!-- opening head tag -->
        <title>Page Title</title> <!-- title tag -->
    </head> <!-- closing head tag -->
    <body>  <!-- opening body tag -->
        <h1>Homepage Headline</h1> <!-- h1 headline -->
        <p>This is a paragraph.</p> <!-- paragraph -->
    </body> <!-- closing body tag -->
</html> <!-- closing HTML tag -->
Keep in mind that indentation is used by developers to help make sure that their HTML is nested properly and to ensure that all opening tags have a corresponding closing tag. Just like HTML comments, the browser will not display indentations in the code, these formatting patterns are there solely to help improve the readability of code.
The following version of the sample code is not nested correctly. Take a moment to look and find the nesting errors here.
<!DOCTYPE html>
<html>
    <head>
        <title>Page Title</title>
    <body>
    </head>
        <h1><p>Homepage Headline</h1>
        This is a paragraph.</p>
    </body>
</html>
There are two nesting errors in the previous example:
- The opening <body> tag is contained within the opening and closing <head> tags.
- The opening <p> tag in the <body> content is contained within the opening and closing <h1> tags.
This code actually will render in some browsers, but just because something renders doesn’t mean that the code is syntactically correct.
Conclusion
In this post we’ve learned what HTML is, what an HTML element is, what an HTML tag is, and how a basic HTML page is structured. Do you have any questions about any of these concepts? Leave your questions in the comments!
This post is the first in a series of intro to HTML topics inspired by my HTML workshop at the TechLady Hackathon in August, 2015. This post will be updated with links to the other posts in the series as they are published.
On the Death of Websites
When most people think of a website dying they think of sites that are temporarily pushed off the face of the internet by denial of service attacks or sites that are maimed and manipulated by hackers. Though these two things certainly do cause websites to “die” temporarily, there are so many other ways websites can go to the other side for a little bit… or for good. And however they go, there are always so many feelings.
There is that “oh shit, I killed it!” moment that happens to developers everywhere. Maybe you forgot a semicolon in your PHP and got a white screen of death in return. Maybe you updated your plugins and were inexplicably gifted the same result. Maybe you just did something ridiculous in a moment of temporary insanity like drag one folder into another folder on your server. In most of these cases revival is pretty quick and the dominant emotion is probably fleeting panic followed by the thought that no one probably noticed anyway. After all, you only killed it for thirty seconds, right?
Then there is the surprise takeover. Have you ever gone to a website that you built and maybe even thought you maintained only to find that your website is gone and an imposter has taken it’s place? Did the powers that be really rebuild and repoint their domain on their own?!
Most takeovers are deliberate and mutually agreed upon transfers of power though. Sometimes downloading your files, exporting your database, and packaging it all up to send into the ether is enough to make you feel ill. What will the new keepers do with your files? Will they even use them or are they going to go into a deep dark archive only to be forgotten forever? If you’re the receiver of the package, then what will you find? Will the code be clean? Is this going to be a nightmare to maintain? Maybe it will be easier to just rebuild it…
Then there is the launch surprise. You are responsible for pointing the domain away from the website you’ve maintained and into the unknown. What will be there? Sometimes what is there is beautiful and makes you feel awful inside. Why didn’t you build something as awesome before? Could you, if you wanted to? Self doubt will win every time. Other times what is there is arguably a step back from what you’d built. Why would anyone want this new monstrosity instead?
Sometimes you are replacing your own work. Most of the time this results in genuine relief – thank goodness this old, horrific code of mine is leaving the internet forever. I know it was cutting edge at the time it was built, but it is positively embarrassing today. And doesn’t it look so much better now anyway?